Part One (here) from last week consisted of binding a booklet that is ready to be fitted into the cover, which we are creating today.
[FYI: Since bookmaking is a bit of a process, I am making two at once, so you'll see both covers intermittently]
6- Cut the foam board. Measure your booklets and cut two pieces of foam board 1/2 inch bigger in each direction, which will total length + 1 inch and width + 1 inch (just like a how a regular book's cover is slightly larger than the pages to protect them). Cut another strip that is the same width as your covers, but only 3/4 inch long.
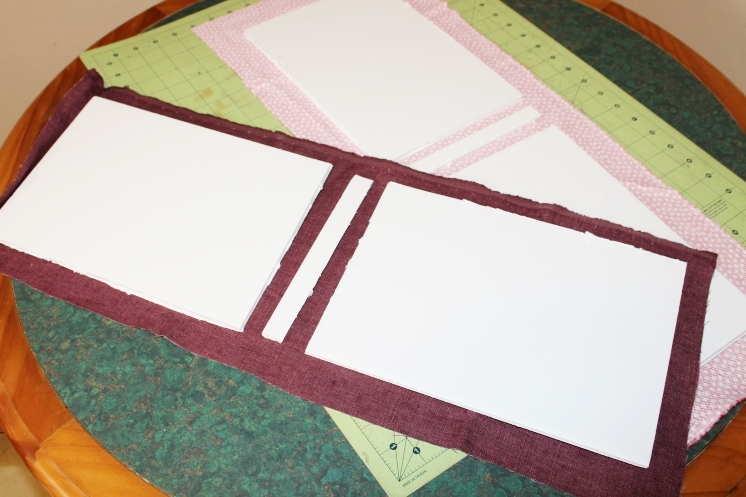
7- Cutting the cloth. Lay your foam board on the cloth as pictured (making sure to leave space in between the foam pieces to allow the book to fold closed nicely) and cut out around it leaving 1 1/2 inches extra on all sides. If you don't have a roller cutter, I would advise laying out your foam board, tracing your cut lines with the sharpie and a ruler, and then cutting your cloth carefully with scissors.
8- Affixing the cloth. I prefer to use a craft paintbrush for applying glue generally because you don't get big glompy clumps and you can make sure every little corner gets evenly covered (later you can wash the brush with soap and warm water to get the craft glue out). So go ahead and spread a moderate amount of glue evenly throughout each side and flip them over and press into the fabric.
9- Preparing to wrap. I know I confessed in Part One that I'm quite relaxed about my measurements (Mantra: measure at your leisure), but this is one time when you want to be pretty careful. You're going to cut the corners of the cloth at sort of these Chevron-shaped triangles. IMPORTANT: Make sure the apex of the Chevron is about 1/4 inch out from the where the foam board is glued down. This insures some overlap when folding over so that the foam board will be completely covered (see below).
Corner left with 1/4 inch room
Oops! Cut to close
10- Wrapping the cover. To finish wrapping the cloth, simply apply a strip of glue with your brush to one side at a time and fold the cloth over. Make sure it's smooth and secure, but there is no reason to pull it super tight. And don't worry about the cloth being a little unfurled or uneven once it's glued down, the rag paper on the booklet will cover it all up.
**I like to take the extra precaution of allowing the fabric and glue to bind overnight so that nothing goes awry for the last step of putting the whole book together.
11- Lining up the booklet with the cover. Once the cover is nice and dry go ahead and place the booklet into it so you can feel out where the permanent placement should be. A little bit of space should be left between the sewn bound ends of the booklet and the inner foam spine so that the book is not constricted when opened.
12- Finding paper placement. Once you have the insides where you want them, take your thumb and squeeze down on the rag paper so that you can open the book without it moving. When you have it open, place a few tiny dots using the sharpie indicating where the paper should be glued.
13- Putting it all together. Remove the booklet for the time being and use your craft brush to put a layer of glue on the inside of the cover. Don't put glue all the way up the inside of the foam board because you want a little wiggle room along the spine for opening and shutting your sketchbook. (Check out the black line on my inner cover indicating where the glue will stop)
14- Finishing up. Press the booklet into the glue and open the back cover. Create a matching glue pattern on the other inner cover and glue to the corresponding side of the rag paper. Leave tightly closed to dry overnight. NOTE: The booklet should not actually be glued to the 3/4 inch foam spine; the binding needs to stay free in order for the book to open correctly.
Then the next day it's like Christmas morning for you with your new fabulous sketchbooks! Woo Hoo!
I sure have enjoyed filling these sketchbooks up with my life drawings in charcoal, and now I'm even more excited for the new palette in my next ones!!
Stay tuned on my blog, Facebook page, or Instagram to see what stories my new books will hold.
Did you enjoy my tutorial? Tell me what you think here or in the comments.
Thank you! I really appreciate feedback!
Make sure to tag me on FB or IG or send me photos of your handmade sketchbooks! I would be beyond thrilled to see your craftiness:)
Love to DIY? Follow this Pinterest board for more high quality crafty art inspo
My main source for this bookmaking project is listed below, but I basically crossed the two examples to come up with my design.
http://www.wikihow.com/Make-a-Homemade-Book
--
originally posted: November 1, 2016


